Back in April, I posted nursery mood boards and our nursery design process. Now our nursery is complete! (Okay, it has been for the past five months, but we’ve been a little busy)!
Getting the nursery together was a whole-family effort and I’m so happy with how it turned out! It’s a space that’s continuously evolving, but here are some of the pre-baby pictures of the space.
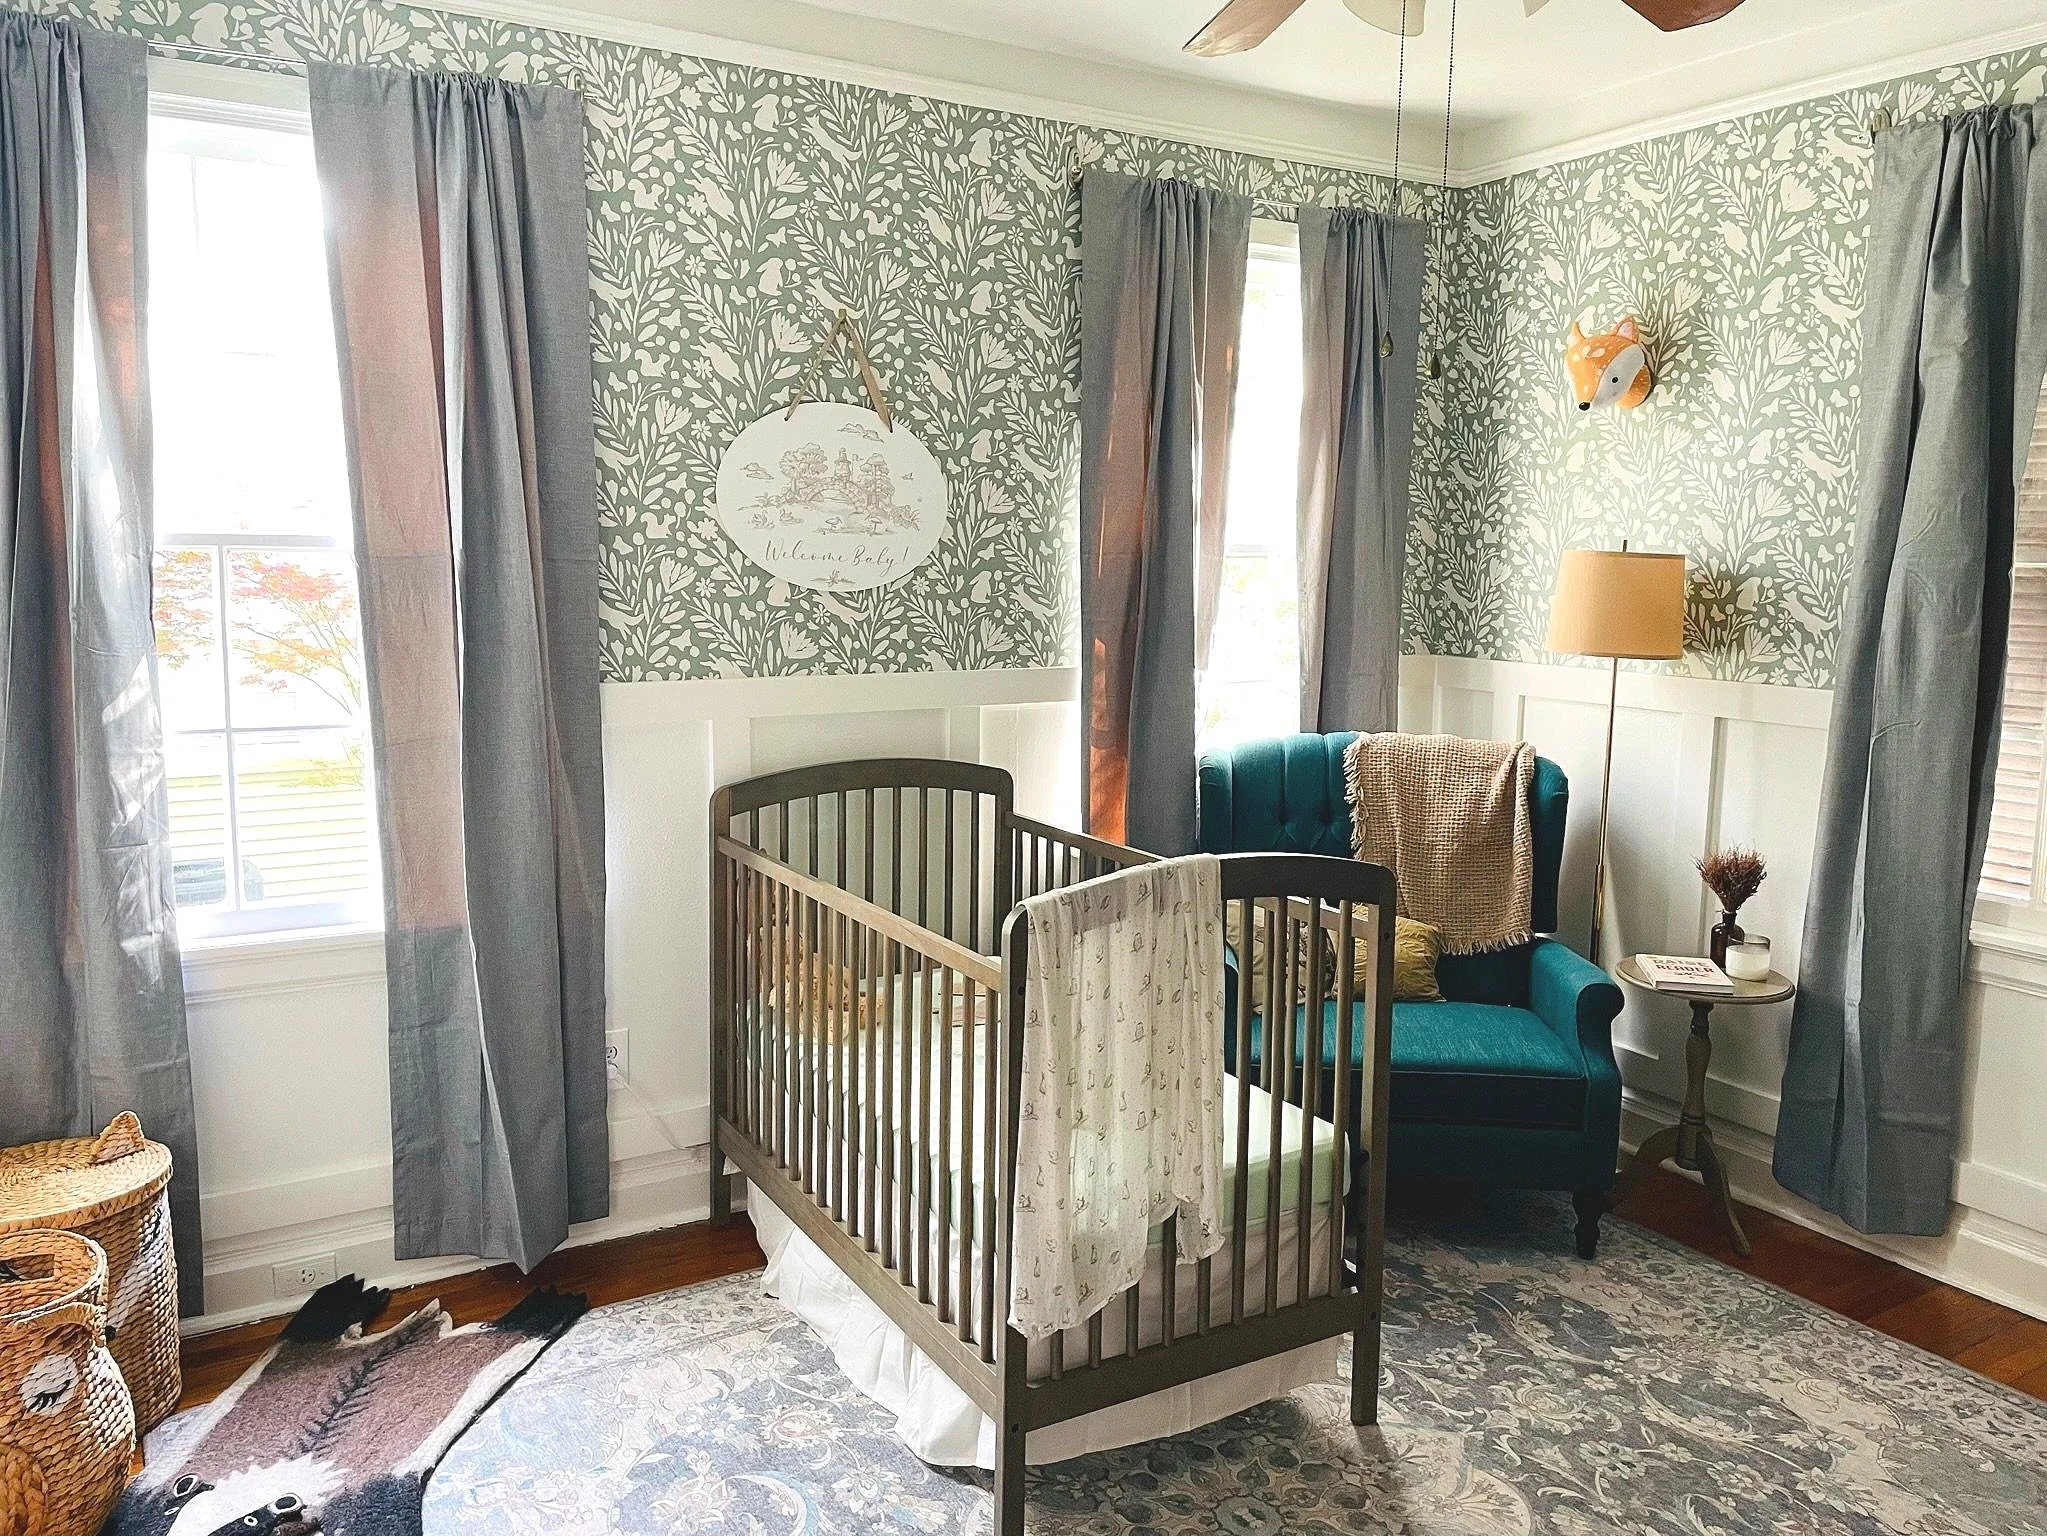
The natural light!!
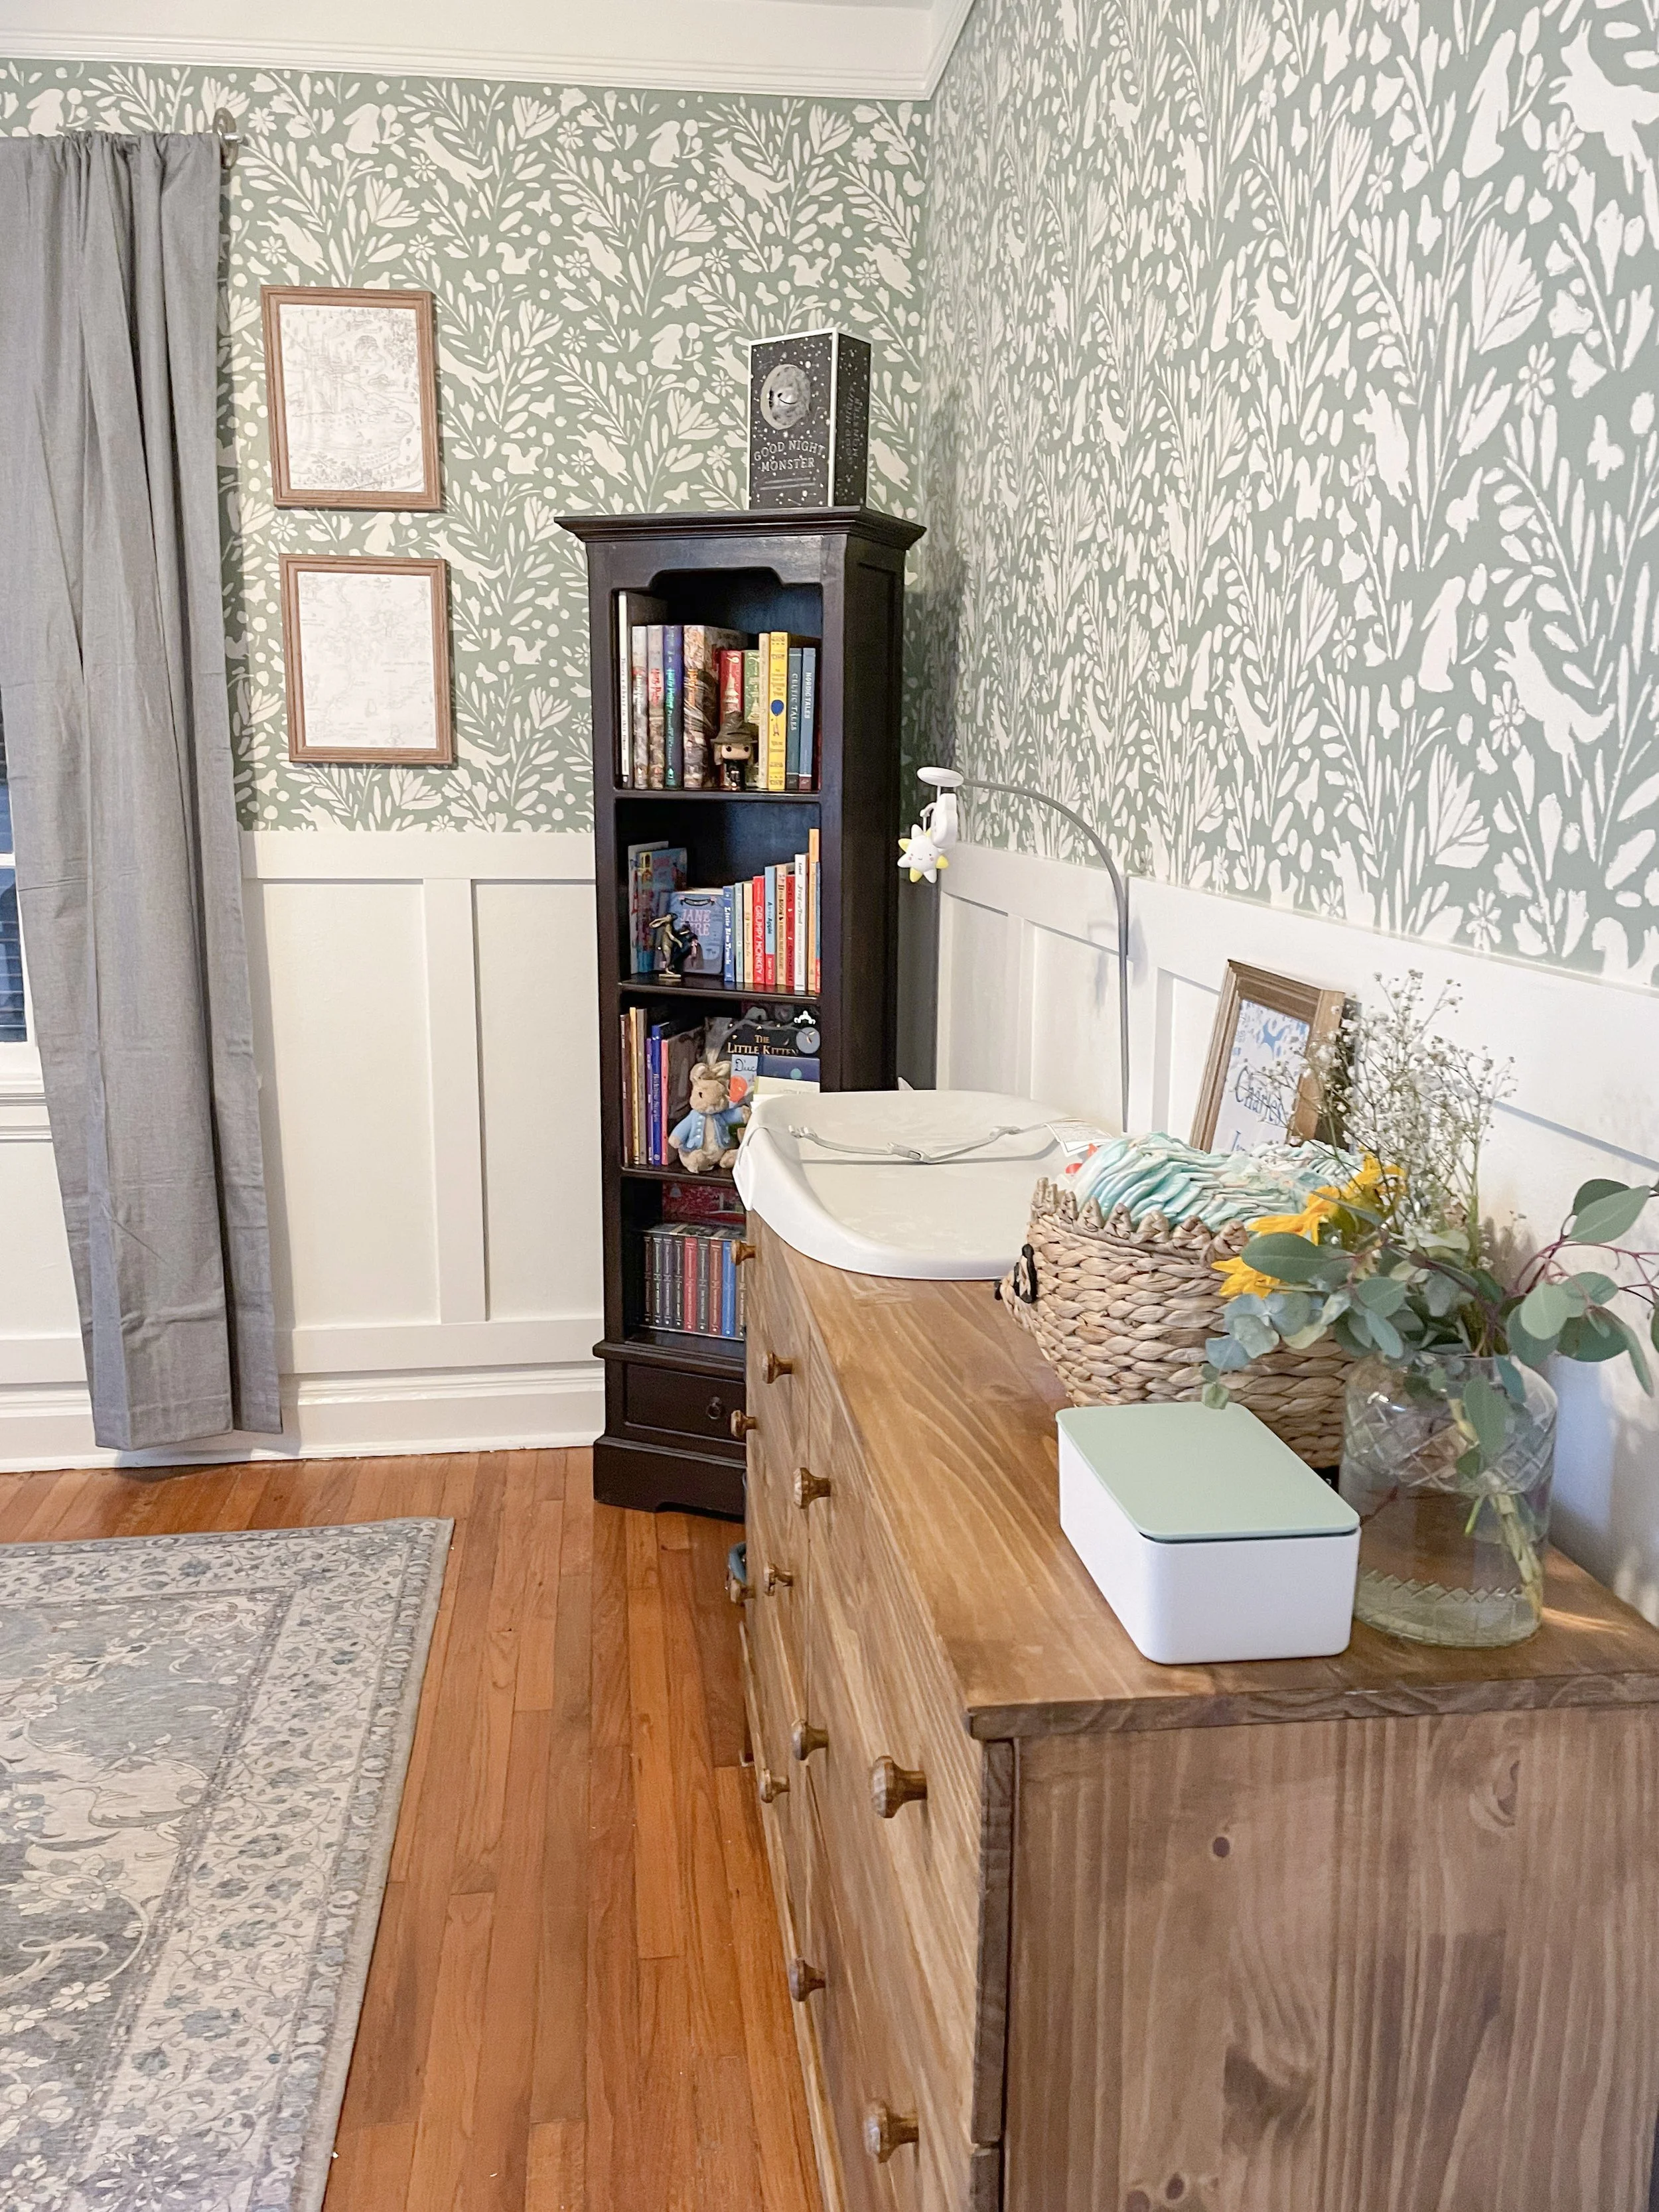
Our changing table/dresser and bookcase.
Getting the room to this state was a whole process, so if you’re interested in the nitty gritty details of getting a nursery together, here’s everything we did to it or bought for it:
Wall Treatment
Board & Batten - Primed 1x4 MDF Boards attached with Liquid Nail.
Stencil - Forest Pattern Wall Stencil
Trim Color - Pure White - Sherwin Williams
Stencil Pattern Color - Nice White - Sherwin Williams
Background Color - Nature’s Gift - Behr
(total cost: ~$1,500 factoring in all of the painting supplies and tools)
About:
For the wall treatment, I wanted something that could inspire playtimes. I imagined a wallpaper or mural that could capture a baby’s attention/interest and inspire a toddler’s imagination, transporting them to a different world. I wanted a gender neutral design and I liked the idea of an enchanted forest.
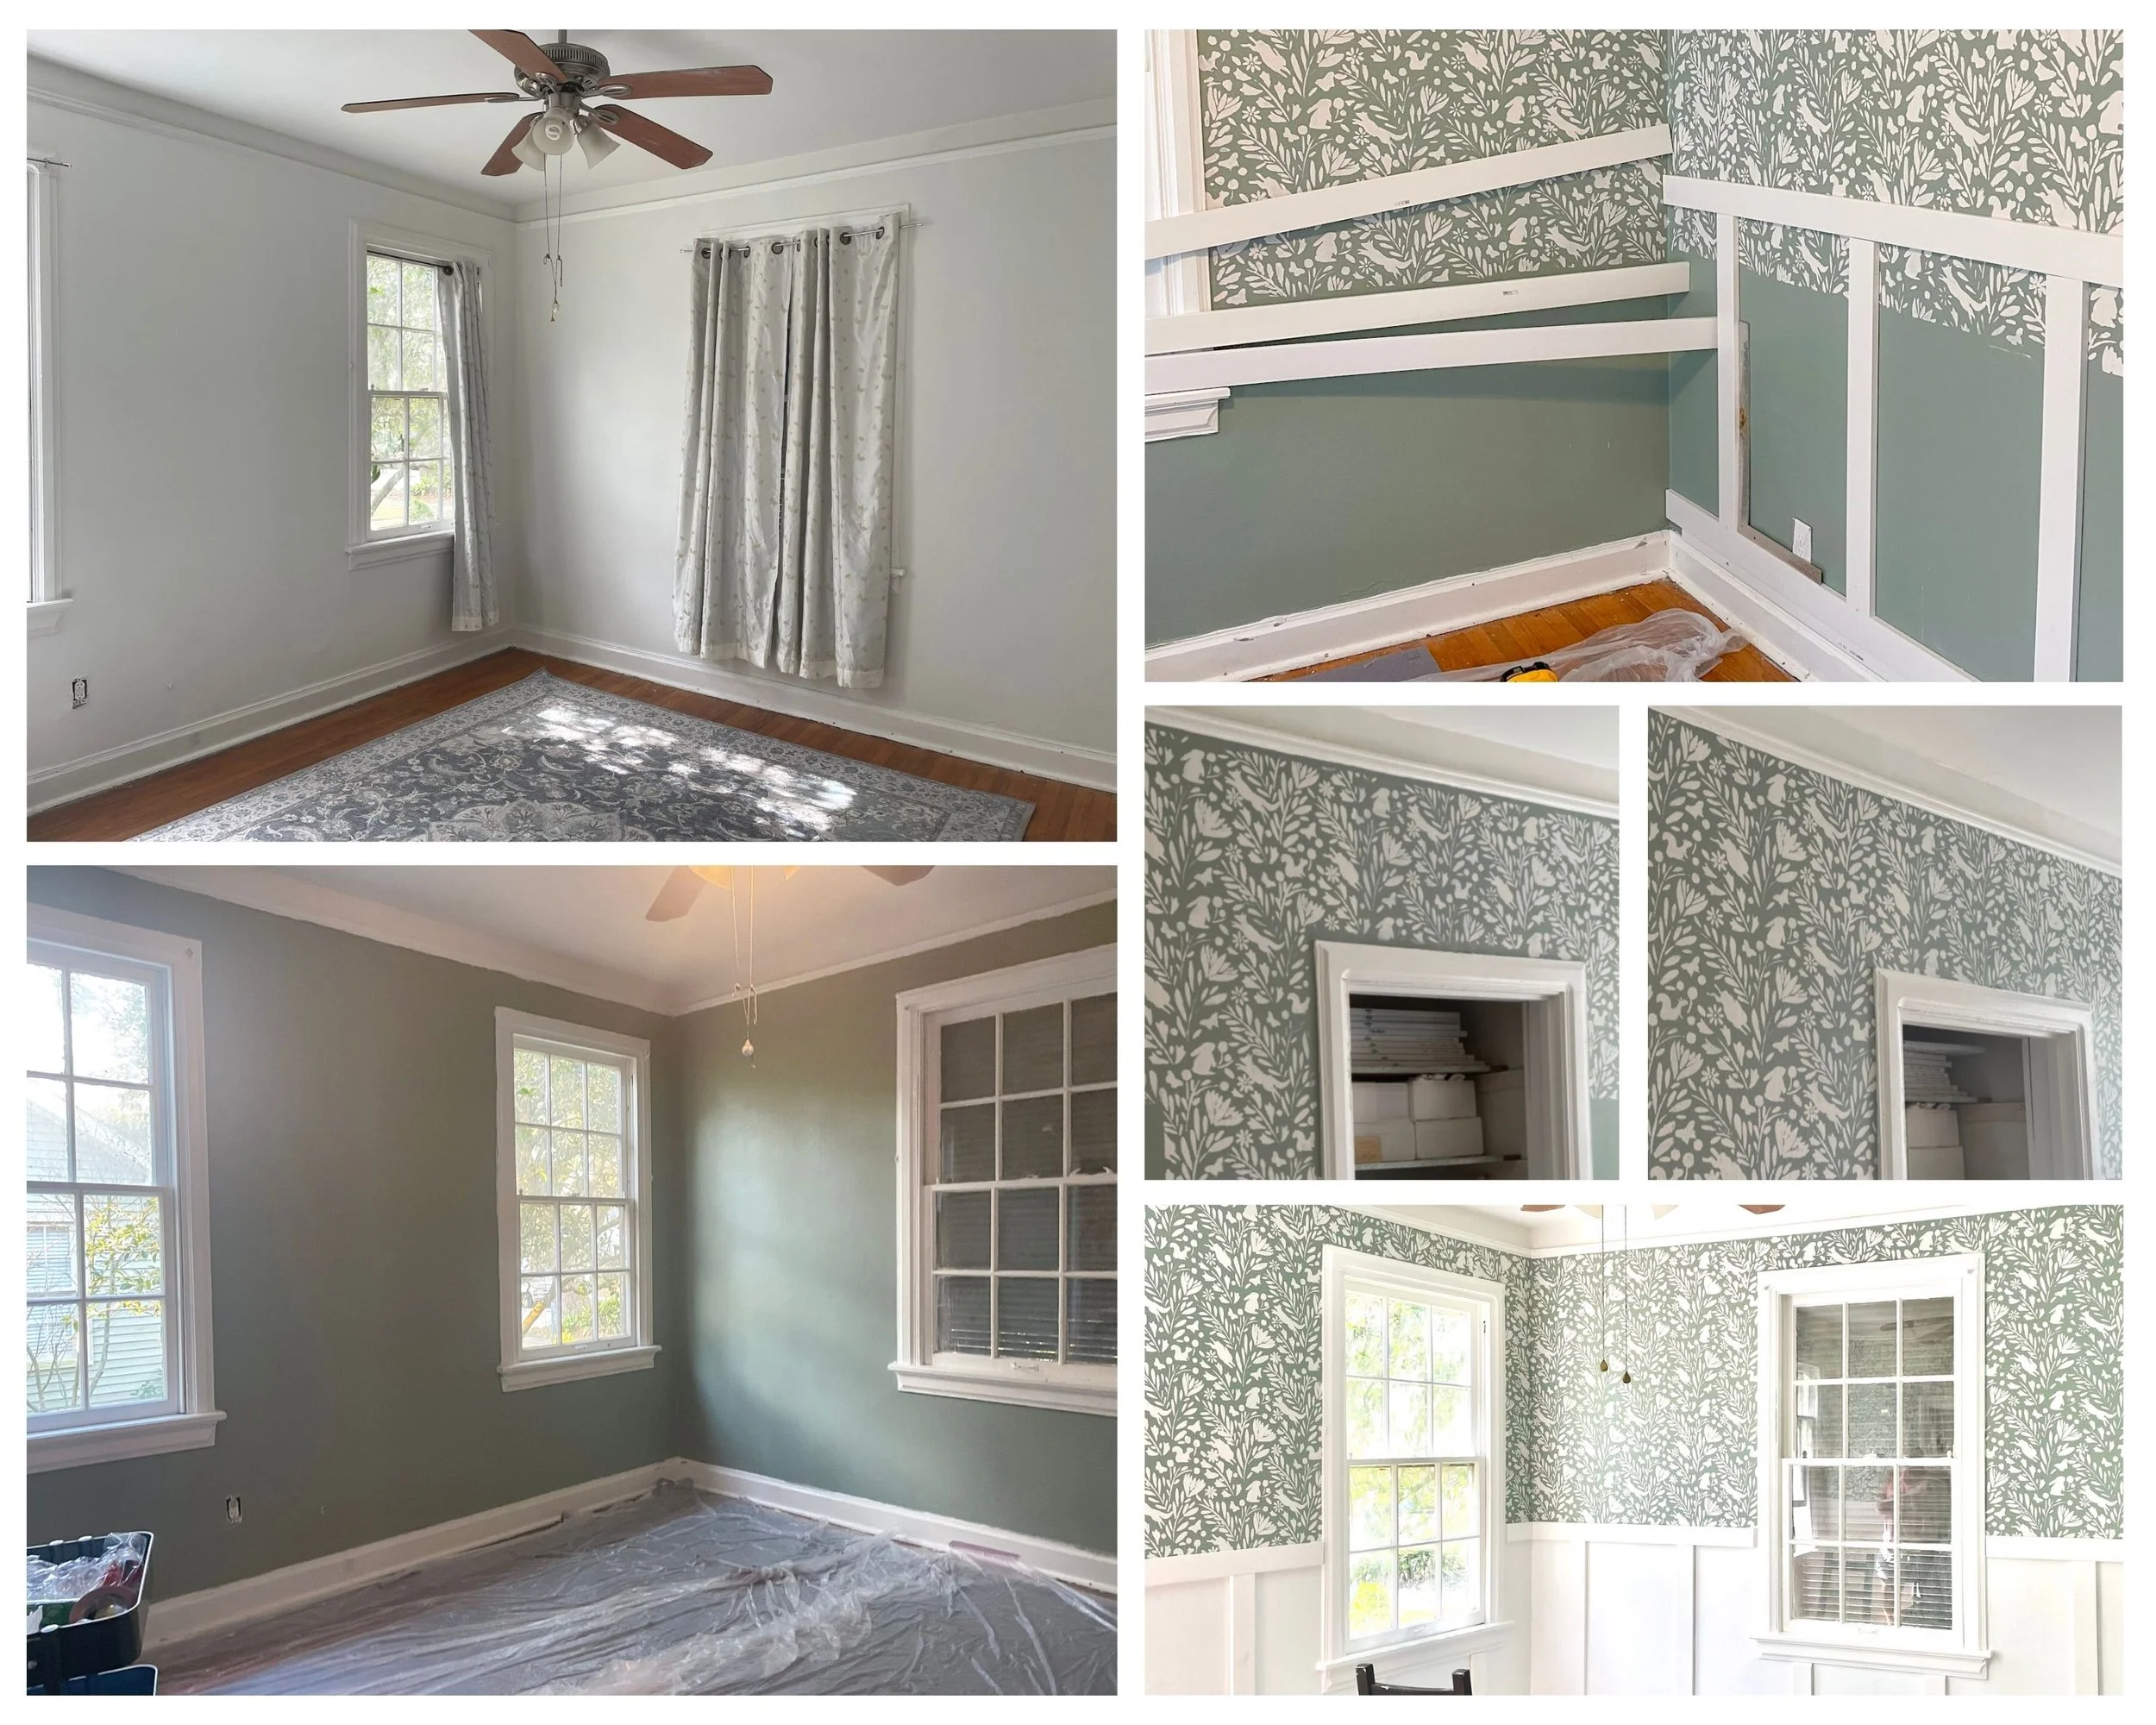
I wasn’t sure about using wallpaper and I’m not a fan of “accent” walls (I hate the idea that one wall is beautiful and loved and the rest are just there), so I decided to decorate all four walls with a stencil. I first chose a forest pattern stencil that felt light and pleasant with flowers and bunnies and foxes. Then, I mocked the room up using Pixlr, and tried out a few different paint color options before deciding on a sage.
Choosing the colors went terribly. I went with Nature’s Gift by Behr for the background and Nice White by Sherwin Williams for the stencil. I would probably choose different colors if I were to do it again, Nature’s Gift is a bit too dark, especially in pictures, and Nice White was a LOT pinker than it looked in person/in the store. Once we started painting the trim, the pink REALLY started to show, and so we kept using it for the stencil, where it was less obvious, but switched to Pure White for the trim.
Also, once we started stenciling, we realized two things: one, we needed a couple extra stencils to cut to get around corners and, two, the pattern was too busy for the wall. We ordered more stencils, and I had a couple of meetings with my dad. I knew I’d like to solve the busy-ness problem by doing a board and batten treatment to the lower half of the wall, but existing trim and wonky plaster walls made the practicality of b&b questionable. After some research, we decided to do the board and batten above the existing trim, to use slightly more pliable MDF to handle the wonkiness of the walls, and to use only liquid nail to attach it all to avoid nailing into old plaster.
It took an entire month of hard work and long evenings, with me, my husband, my mom, and my dad all taking on different tasks. My husband applied the stencil with a roller. I went back with a tiny brush and fixed where details were lost in the design, as well as finishing the design around corners and edges where the stencil itself couldn’t reach. My dad, with his carpentry skills, applied the board and batten. My mom, with the steadiest hand, painted all of the white trim work and the bottom half of the wall.
A lot of mistakes were made, a lot of effort was exhausted, and there were a number of mid-project re-designs, but we all loved the end result, and we can only hope our baby does too.

Room Linens
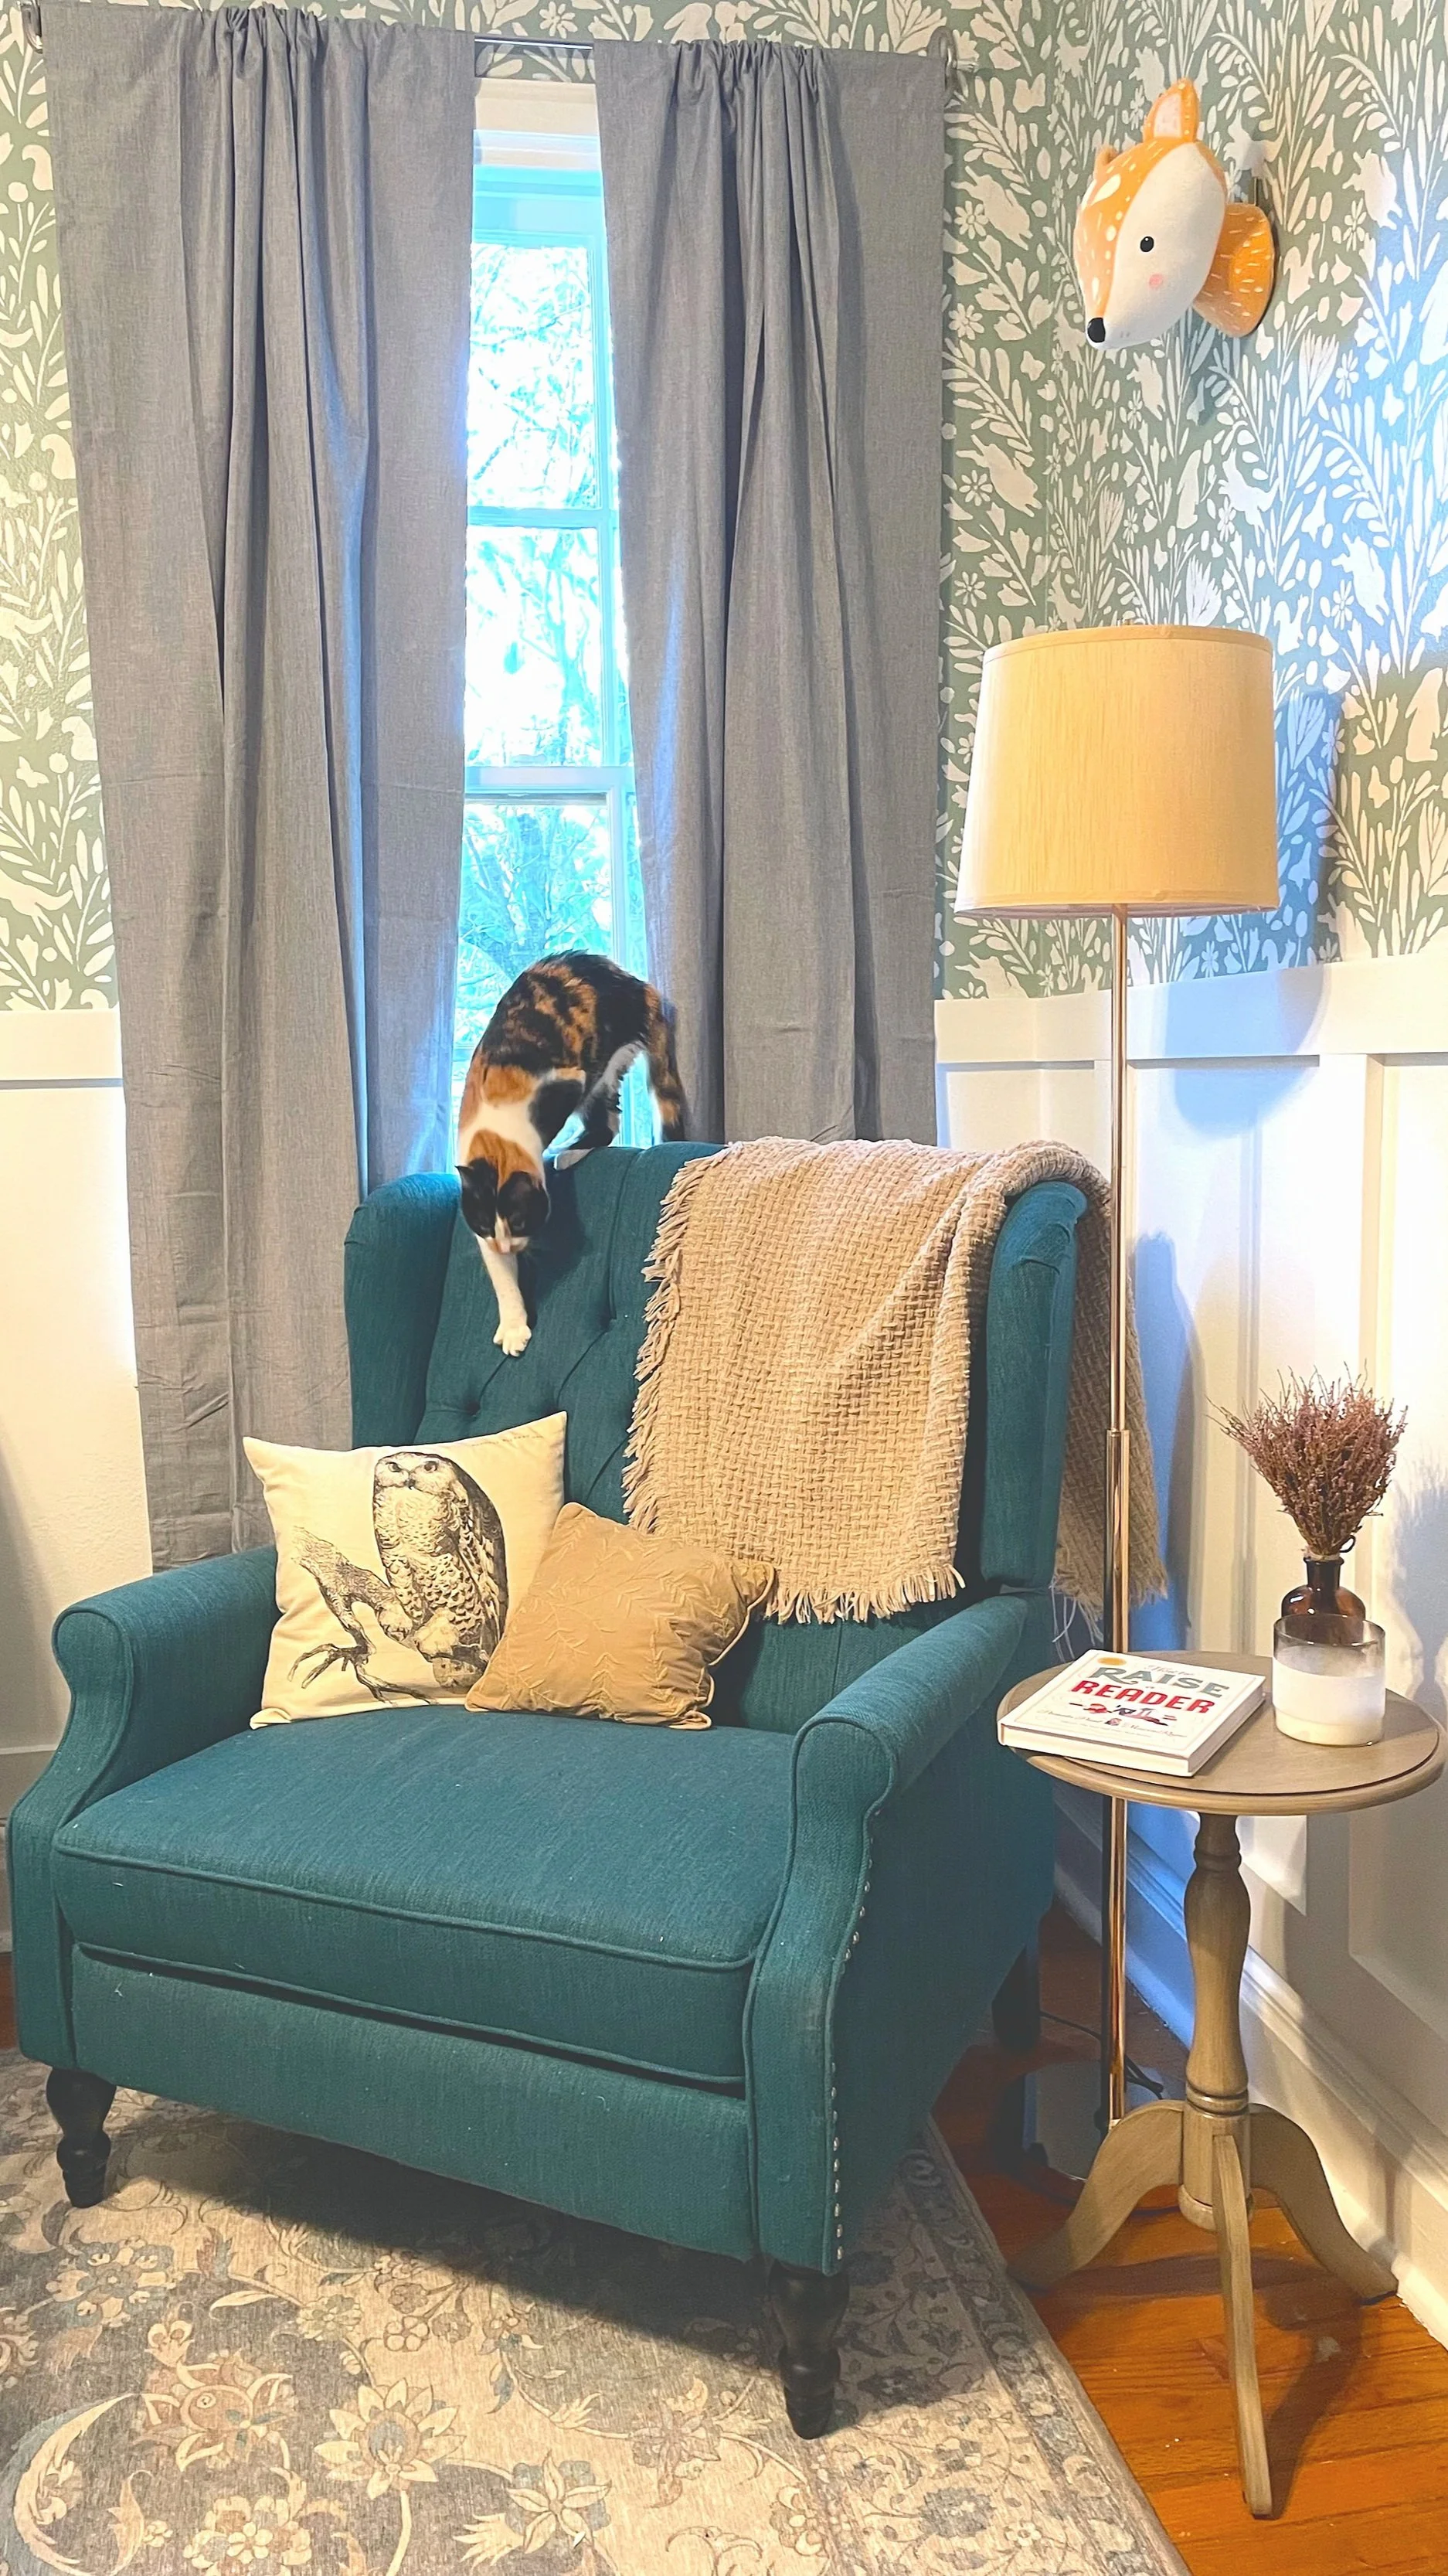
Heathered Thermal Room Darkening Curtains in Grey by Room Essentials
Command Curtain Rod Hooks - Brushed Nickel
(total cost: ~$650)
About:
Chase bought me a Ruggable rug for the nursery for Valentine’s Day. We knew we needed a rug for the nursery, because we have a raised house with wood floors that get ice cold during the winter, and we want our baby to be comfortable playing in their nursery year round. The Ruggable rug was slightly pricier than some other options, but we’ve thrown away a number of rugs over the years due to animal accidents, and felt investing in a rug we could throw in the washing machine when it gets pee, vomit, and or poop on it would be worth it in time. I like the muted, cool colors of this design, which felt calming and neutral without being boring. The pad is also nice and squishy and super comfortable to stand and sit on.
In the past, the curtains have been hung above the windows in this room with minimal, flimsy hardware, some rods just balanced on nails. Hardware can’t go into the wall because (sigh) plaster, so in the future it has to be placed on the window frames. They were an end-of-nursery-overhaul project, and at that point I was getting both decision and Lowe’s fatigue, on top of just fatigue, so I just bought Command Hooks for the cheap, bent curtain rods that had already been in the room. Before the baby starts crawling, we’ll get actual, sturdy hardware, secured to the window frame, and not-bent rods, but this solution was cheap, easy, and quick AND I got to place the curtains where they’re supposed to go, design-wise--a little taller and wider than the windows.
As for the curtains themselves, we wanted something simple that didn’t either blend into or compete with any elements of the already-very-busy walls, so we got some simple gray curtains, of a room-darkening thickness, for nap times. They’re a little darker than I hoped they’d be, but I like how they draw your eye up and elongate the room. I was a little sad to cover the windows, though, two of the windows get golden afternoon light through the leaves of the Tea Olive trees planted outside of them.
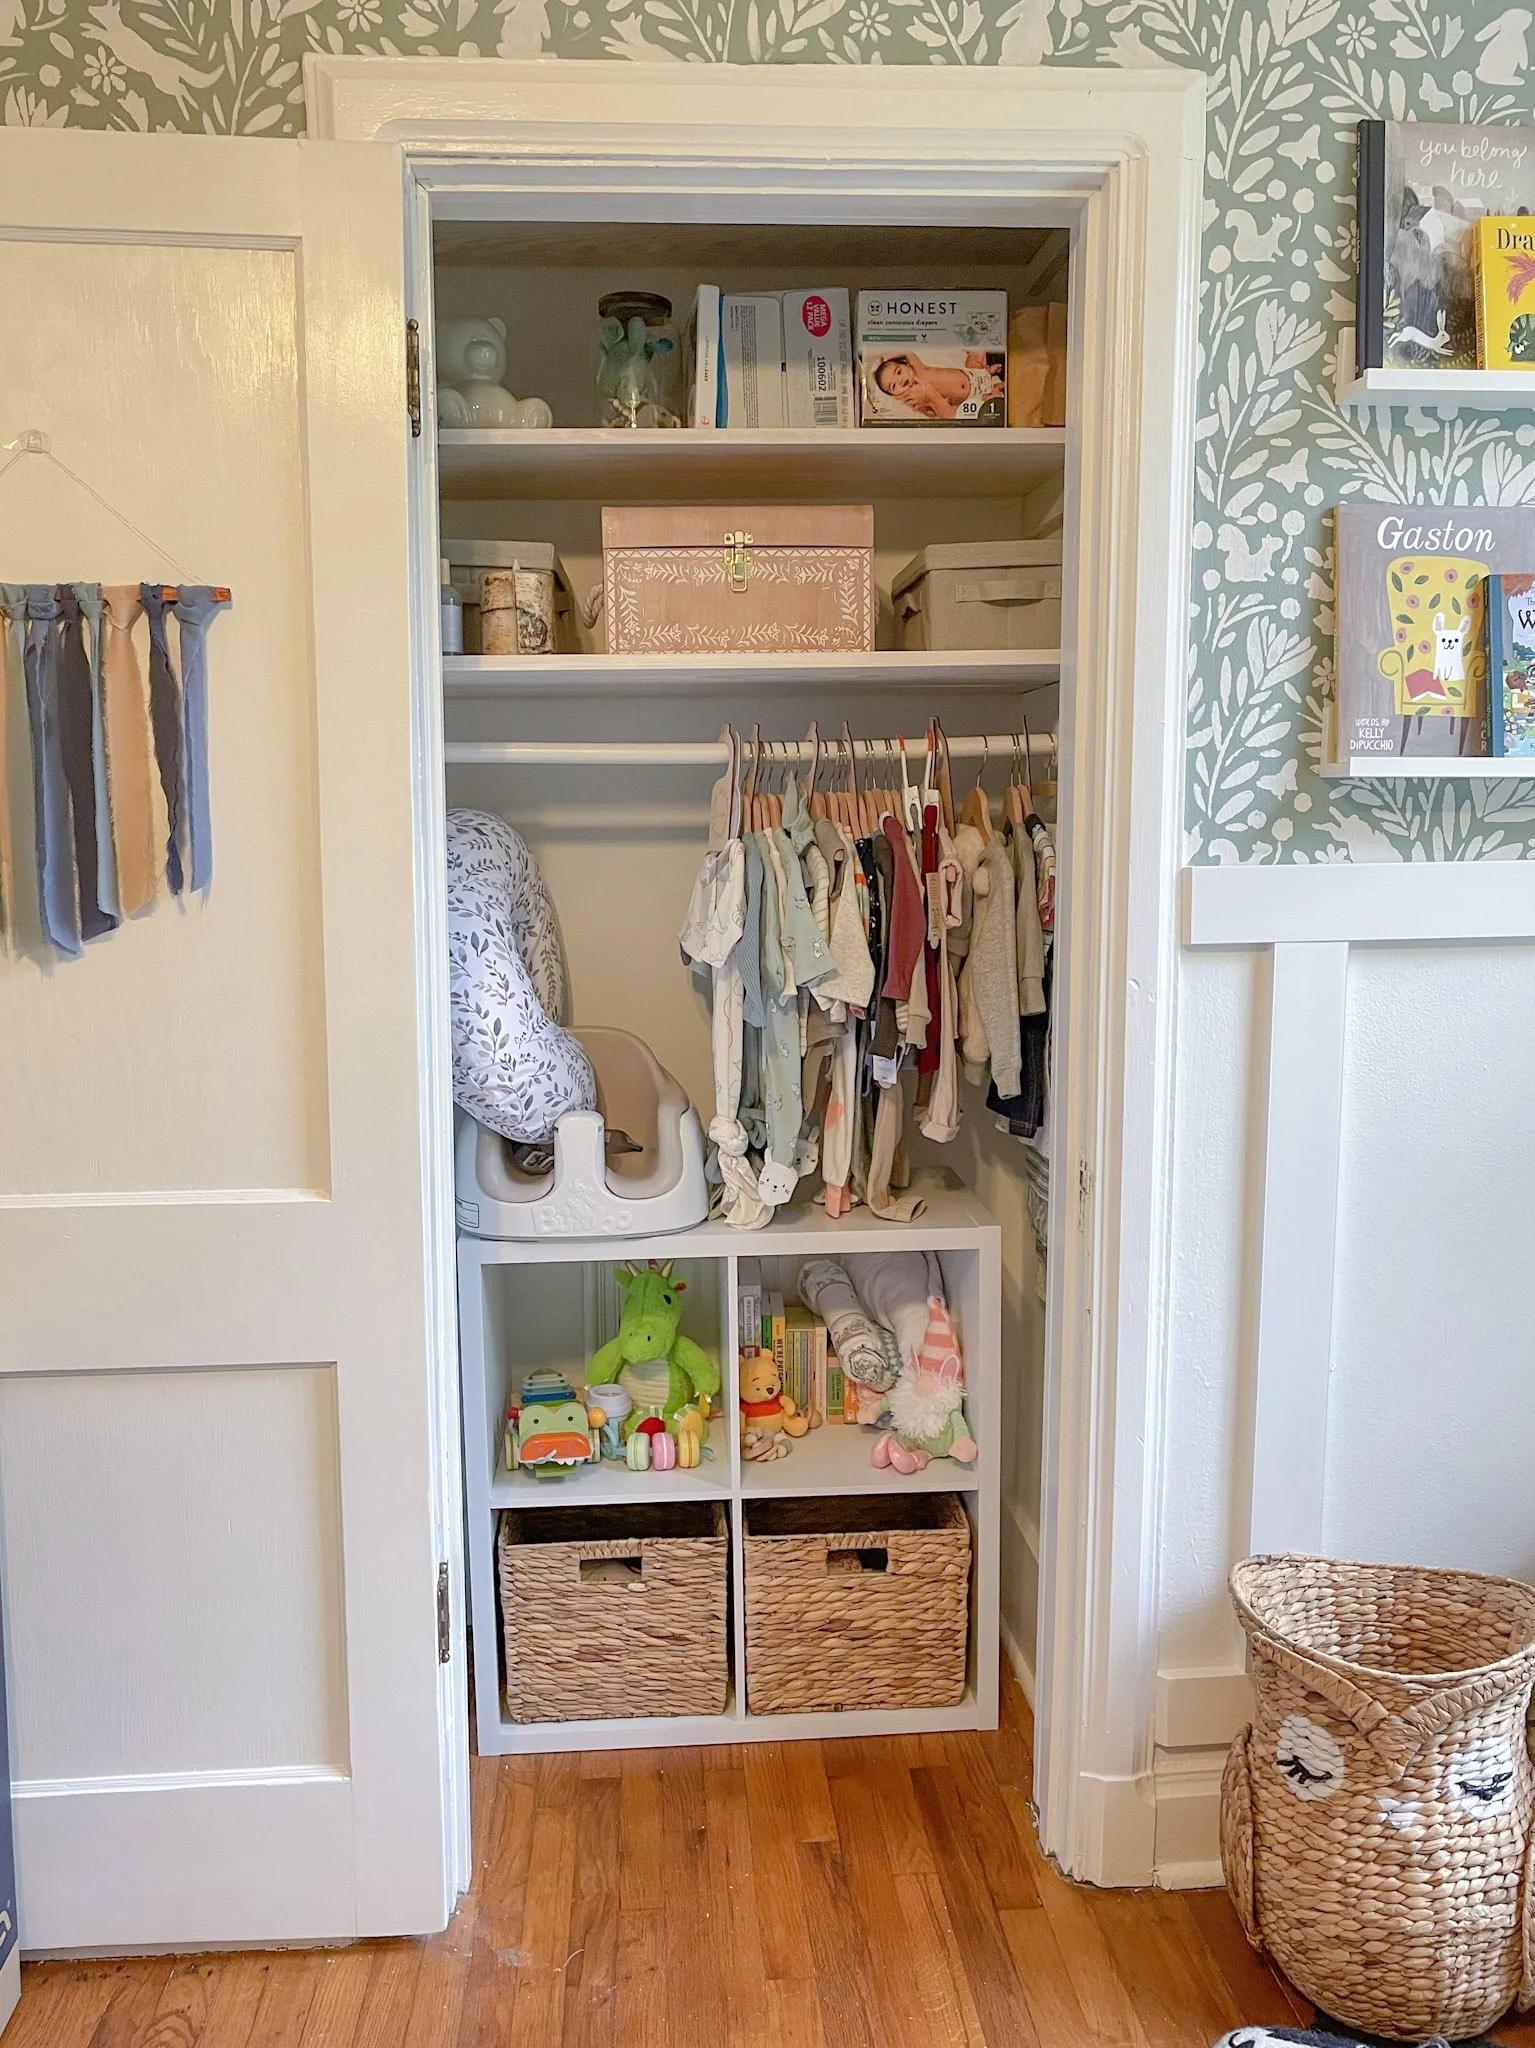
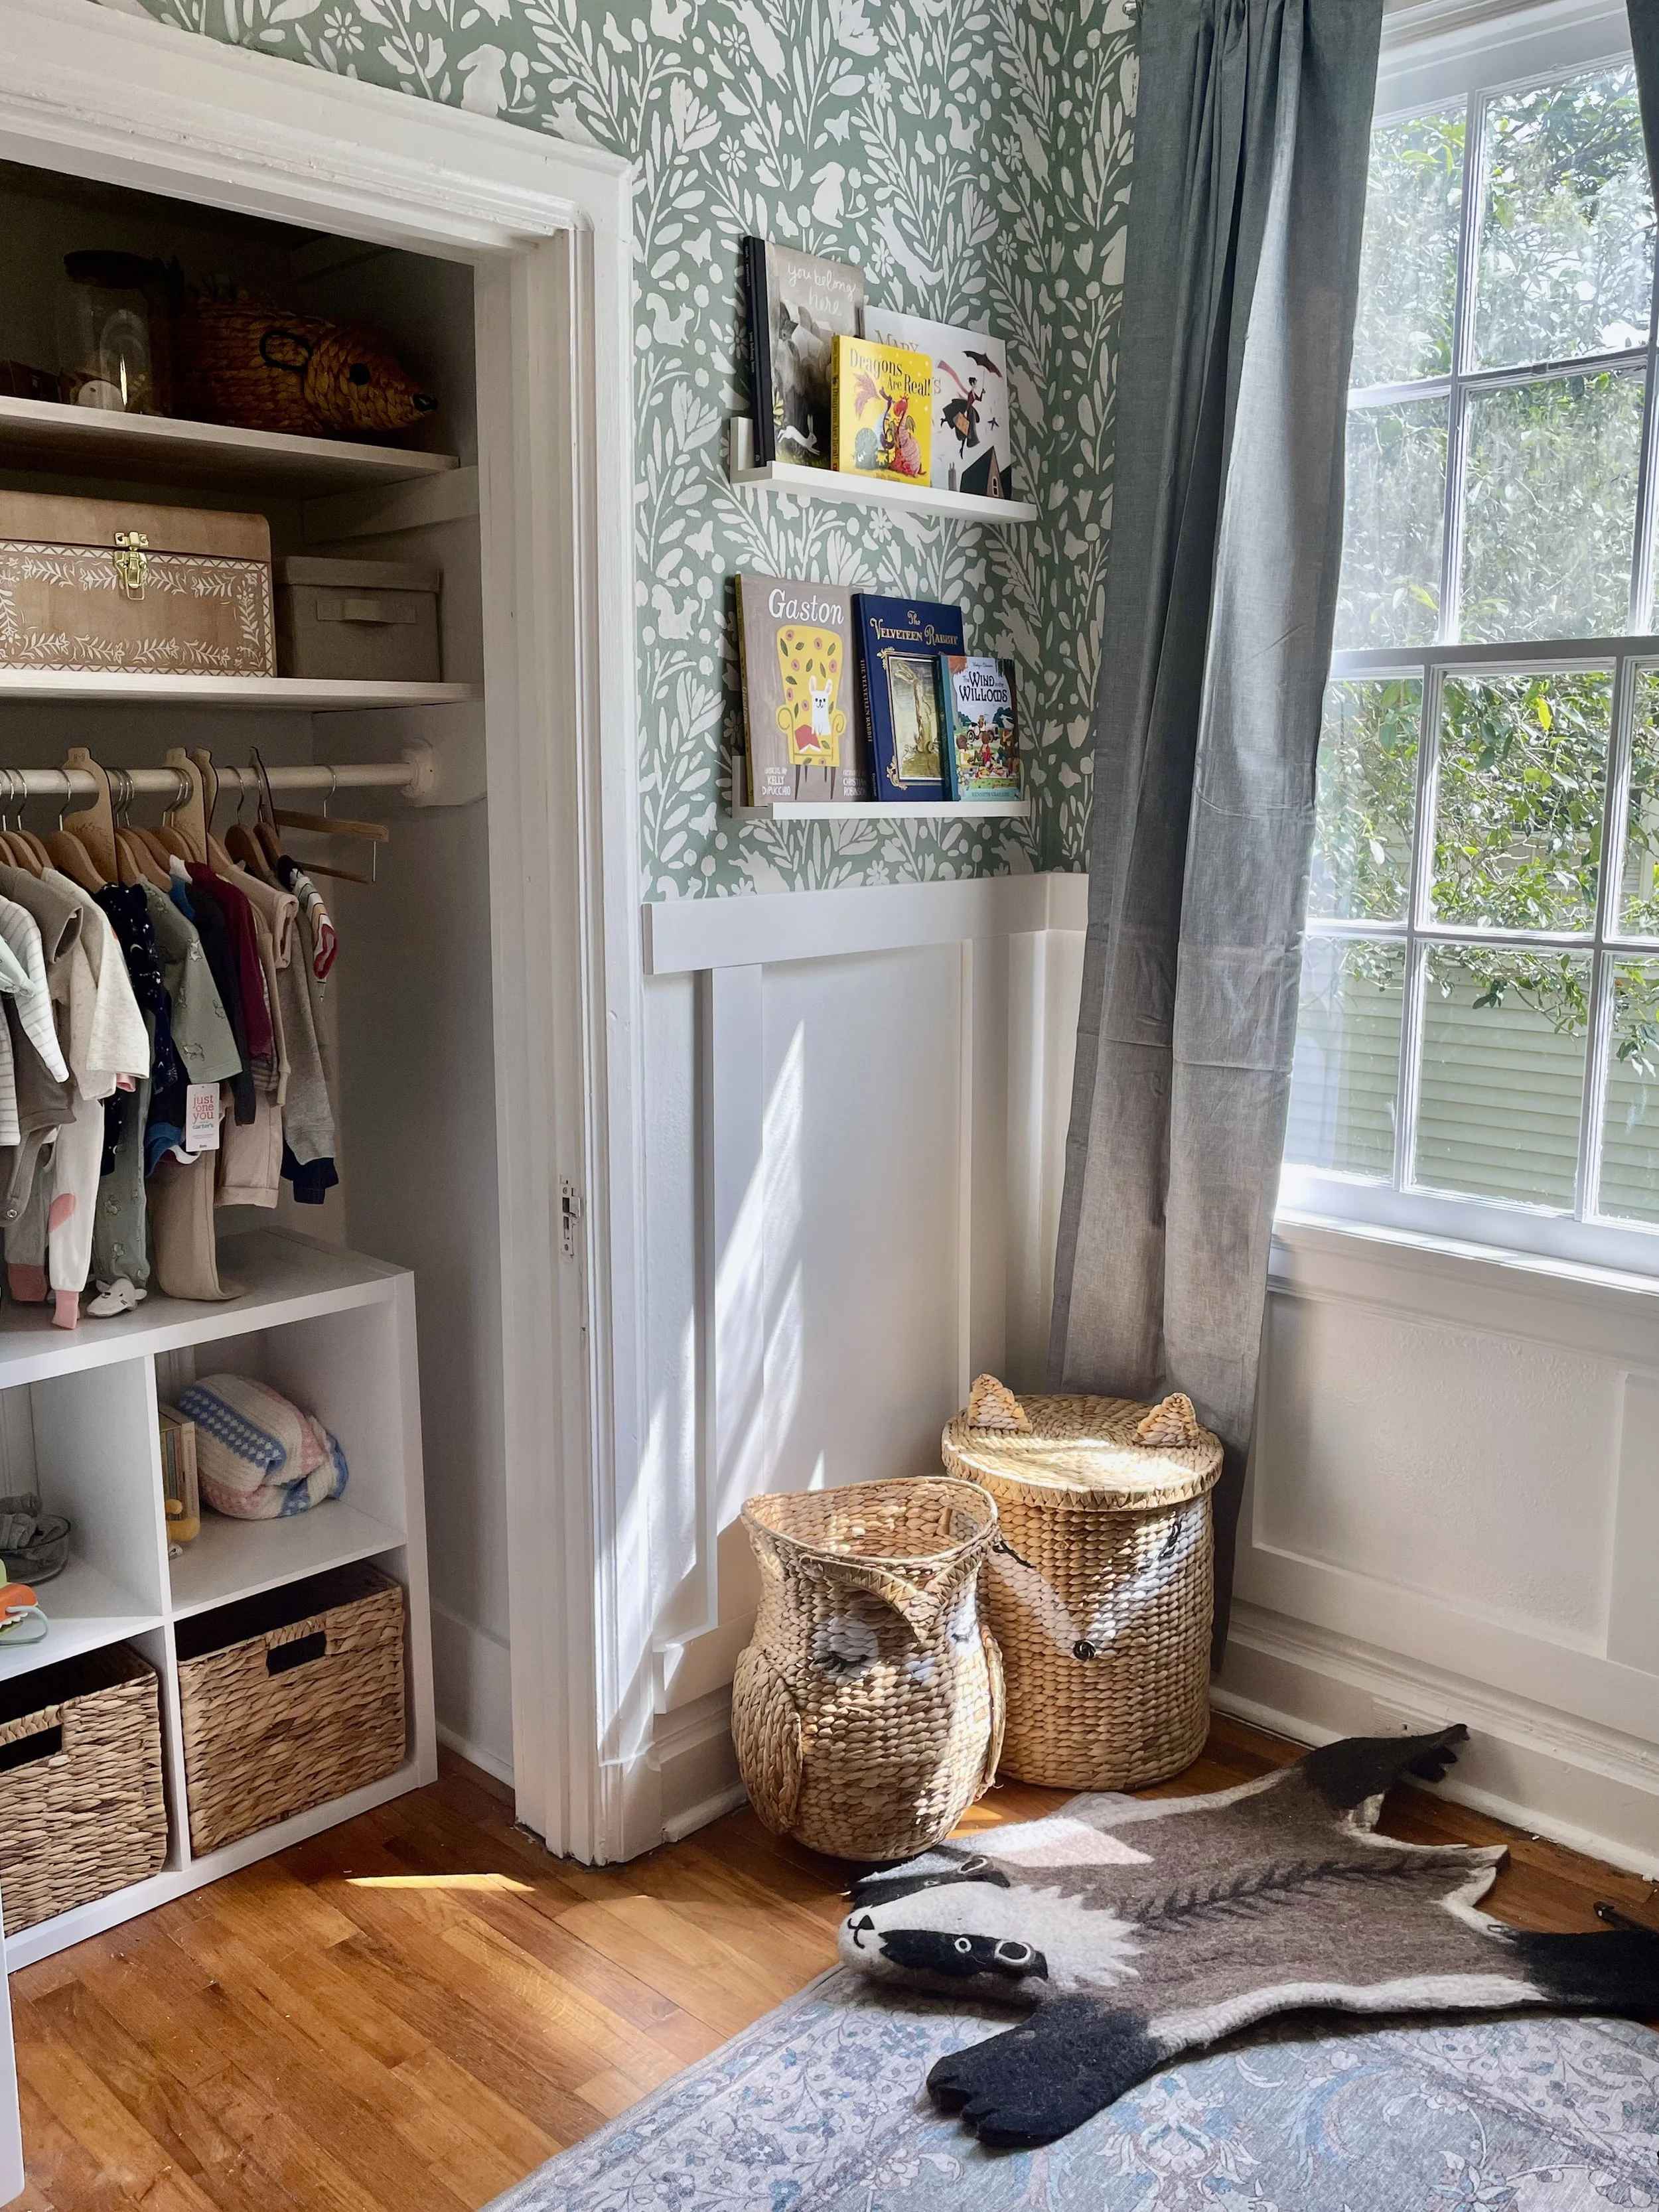
Closet
Hedgehog Diaper Caddy (registry gift)
(total cost: ~ $250, not including $100 in wood, paint, and spackle to repair the closet)
About:
The Closet was another BIG nursery project. It really hadn’t been touched since the 60s, which was obvious, because the shelves had that famous 60s star-pattern wallpaper peeling off of them. The walls were all yellow, cobwebbed, and spotted with mysterious stains. Worse, when we leveled our house, the closet got missed in the repairs, and there were big cracks and crumbled plaster all over the place. It also doubles as an access point for our house’s main bathroom, so there was a rough piece of drywall over the access point and giant nail holes in the back from a recent bathroom renovation.

The Nightmare
My favorite contractor, carpenter, and handyman (my dad) and I had a meeting to discuss how to repair it. Inspired by the board and batten in the rest of the room, we covered the crumbling corner with liquid nail and a 1x6, adding some quarter round to finish it off and match the rest of the room’s floorboard. My dad also used some beadboard scraps and trim left over from the bathroom reno to create a prettier cover for the plumbing access. Instead of trying to clean up the old shelves, my dad cut some new 1x8s, and I stained them with Minwax’s Simply White wood stain. My dad sanded the walls and spackled over the bigger cracks. I spackled the smaller cracks and primed and painted the entire closet. Then, my dad installed the shelves, and the “Repair and Rejuvenate” part of the project was finished, and all that was left was the “Decorate and Organize” part, which was way more fun.
We have an old house, and small closets, so my organizational plan went like this:
Shelving
There are three levels of shelves above the clothes rack. The top is only visible while standing at the door of the closet and looking up and only accessible by a step-stool. The middle is mostly visible from outside the closet, and can be reached by some tip-toe standing on my part. The third is easily visible and reachable.
I decided that the top shelf would be for keepsakes, future-baby items, and unused furniture parts--items that would not need to be accessed with any sort of frequency.
The middle shelf will be devoted to bulk items, storage for boxes of diapers and wipes, so that they’d be accessible but wouldn’t be a visual clutter.
The bottom shelf will be used for storage for toys, clothing, and frequently-used baby items.
Clothes Rack
On the clothes rack, I’m storing all of the bigger baby clothing items that won’t fold easily, as well as hanging items like blankets and nursing covers. I chose to use wooden hangers for aesthetics, and to organize the clothing by age, with wooden organizers hanging in between the various groups.
Cube Storage
I knew I wanted some sort of furniture piece beneath the baby clothes, since they don’t take up much vertical space. I considered various options like dressers and bins before settling on this 4-cube organizer from Target. It fits the closet well (it’s about 30” x 30”, and the closet is ~36” wide), and I like that I can use the baskets to hide some clutter, while also using shelves without baskets to display items.
Overall, I’m super happy with how the closet turned out. It was a bit of a horrifying nightmare when we started working on the nursery, and now it’s such a lovely feature of the room, I almost didn’t want to rehang the door (which we took off to get dipped and repainted). I feel like every square inch of the closet has a purpose that can grow and adjust as needed.

Furniture
Little Seeds Sierra Ridge 3-in-1 Crib (registry gift)
Halo Dreamweave Breathable Crib Mattress (registry gift)
Christopher Knight Salome Recliner in Teal (Christmas gift)
IKEA Skubb Drawer Organizers in White
(total cost: ~$1300)
About
For the crib, I wanted something that looked a tiny-bit old-fashioned, and would look good going out into the room instead of against the wall, since wall space is limited in the nursery with all of the windows. I fell in love with a crib from Crate & Barrel with great arching ends that felt so beautifully classic and perfect… if it weren’t $1400. So, I found a dupe, the Contours Elston crib, which went out of stock right as I needed to buy it. So I found yet another dupe, with even less of a curve, but available when I needed it, so we got that one. I still think it looks great in the room.
The recliner was a Christmas present from my mom. We had it in the living room for the first couple of months of the year, and are putting it in the nursery in lieu of a rocker or glider until we figure out which place it’s more useful.
From the outset, I knew I wanted a 6-drawer horizontal dresser for the nursery, and that I’d use the top for a changing table and just table surface area in general. The dresser I fell in love with for the nursery is this navy beauty from Anthropologie, but again, the price tag relinquished it to “inspo” territory. So I bought the IKEA Tarva dresser for about $1200 less. I was planning on painting it to look like the Anthropologie dresser, but I wasn’t sure how good it would look against the re-designed board and batten wall, so while we were on one of our other hundred Lowe’s runs while redoing the nursery we bought some wood stain instead, and I’ll leave my Anthropologie dupe for another day/whim.

I also bought Ikea drawer organizers, since baby clothes are so small and it was obvious the drawers would get chaotic fast without them!
Decor & Storage
Burt’s Bees Crib Sheet in Mint from Homegoods (gift)
Tan Throw Blanket from Homegoods (gift)
Cat
(total cost: ~$300)
About:
When I began designing the nursery, the original theme I set my sights on was “magical creatures.” Weirdly enough, there weren’t a lot of options for pursuing that theme in the nursery section of stores, unless I wanted to go full on unicorn rainbow explosion. So I decided to go back to the drawing board, brainstorm all of the theme ideas that even slightly interested me, and eventually decided on a “whimsical” theme. I wanted the room to look like something out of an eccentric English manor, with elements recalling an enchanted woodland. Since then, it’s morphed into a more typical “woodland creatures” theme, but I could still imagine the room in the corner of an English cottage, and I think it’s kept some of its magic.
I pulled in the badger rug I bought while living outside of Bath, added the entire Pottery Barn collection of wicker baskets in woodland animal shapes to my registry, and added a fox head to the wall.
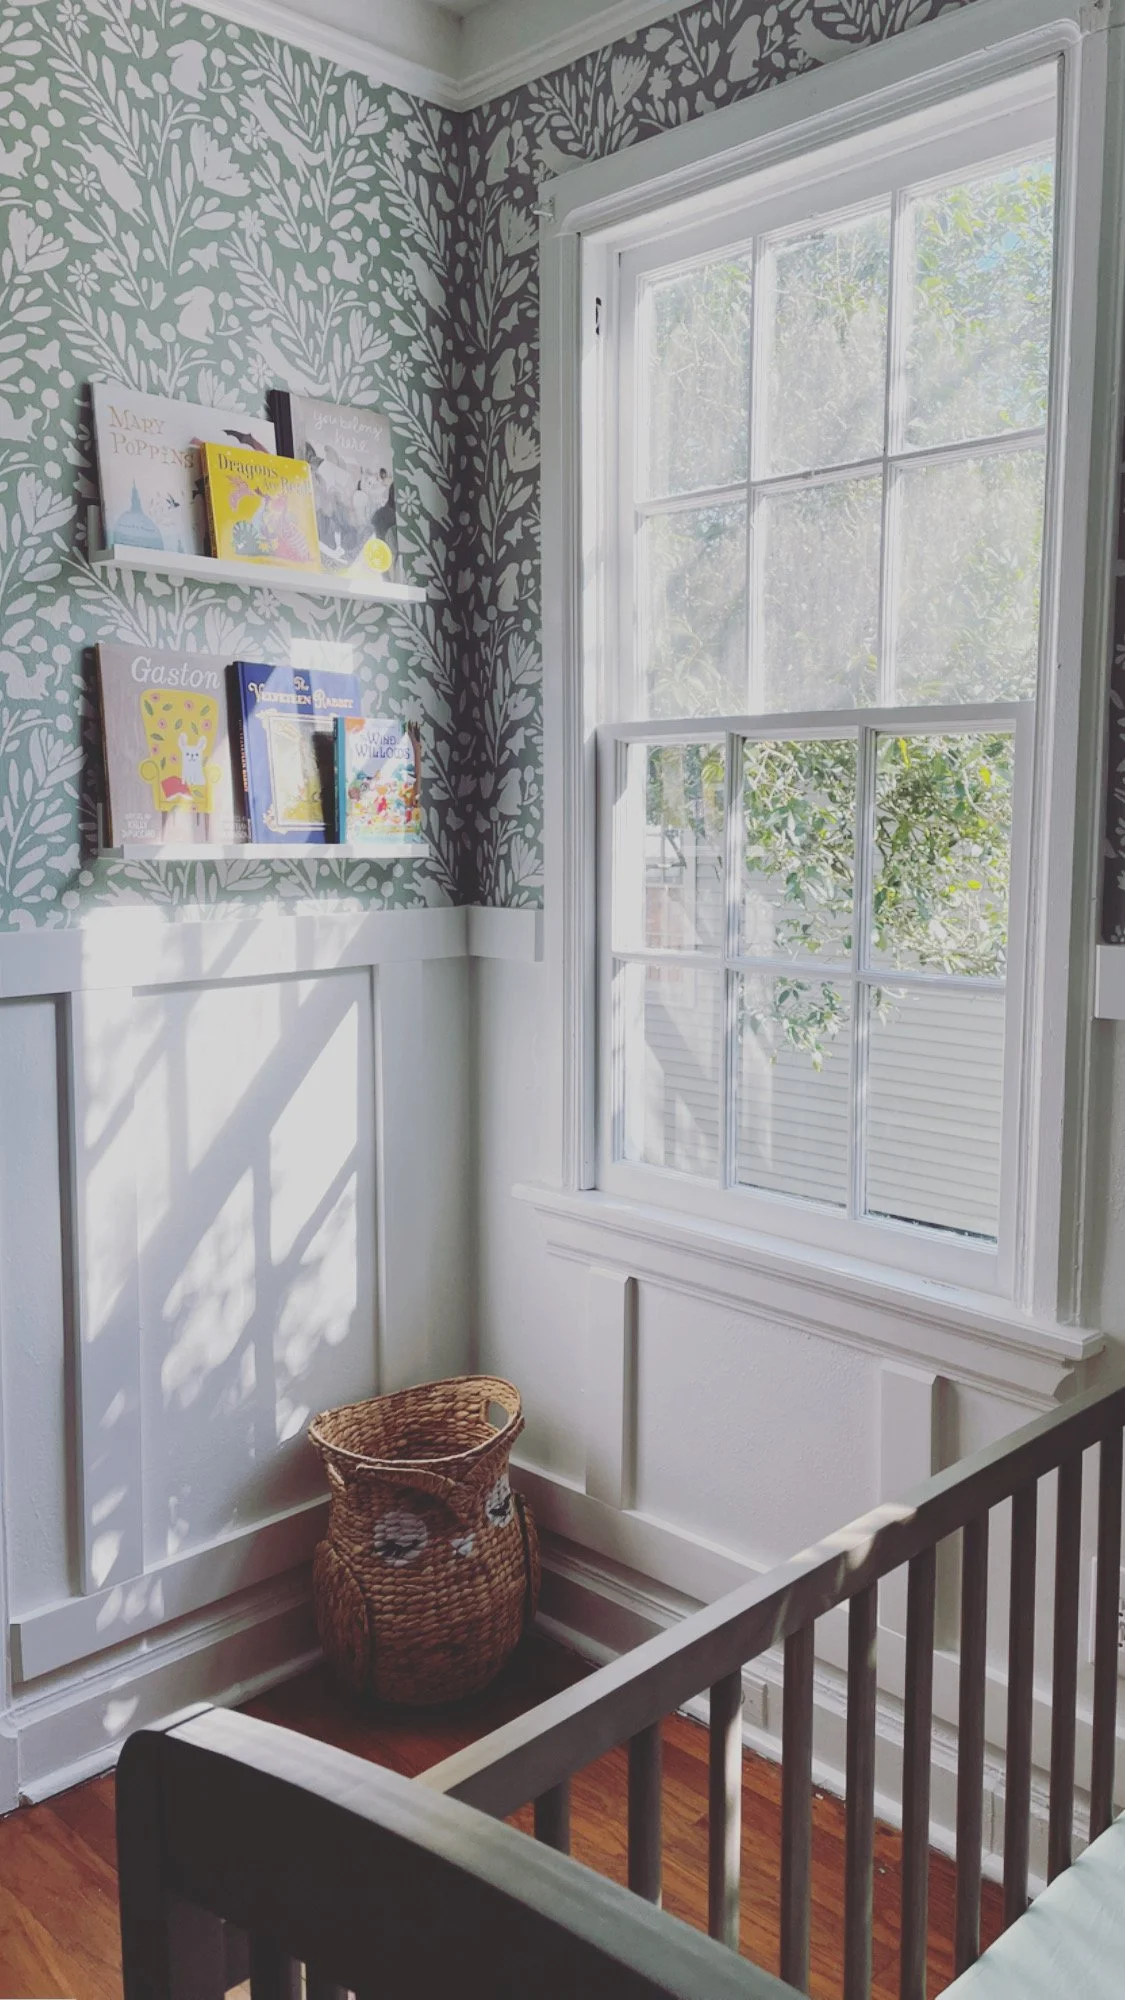
For an extra bit of personality, I added some artwork with illustrations and quotes from my favorite children’s books and maps of my favorite storybook places.

Toys & Books
About:
We’ve been slowly stocking up on toys and books. Most are tucked away for now, but here are some of the ones that you might have seen in this post!
Misc.
As for some miscellaneous items, I replaced the old fan pulls with a set that had an illustration of a fan and light bulb, just to make life slightly easier.
I also bought an LED light bulb that can run on a battery if the lights go out, which they do with some frequency here in New Orleans, so that the baby’s room could always feel like a well-lit safe haven.
And finally, I bought a power strip with child safety slide outlet covers, because outlets in this room are few and far between, and while our baby’s small, I imagine we’ll be in here a lot with our phones, and plugging in various baby items like swings and breast pumps.
And One Final Reveal…

Our baby, Charles, was born June 10th. He is incredibly precious to me and these past four months with him have been some of the most incredible of my life!